SyncPhoto
Sync Photo is a fast efficient way to copy selected galleries from SmugMug to your iPad or iPhone. Once the photos are copied to your device, the gallery can be quickly viewed much like a photo roll. There is no delay flipping from one photo to the next, since the photos are local to the device and there is no need to wait for each photo to download from SmugMug.
Individual galleries are selected for synchronization in the first step, then during the actual synchronization step, only new or updated photos are copied to the device, saving time and network bandwidth. You can indicate that a subset of the selected galleries should actually synchronize during the synchronization step. For example it is possible to select a new gallery for download and then only synchronize that gallery, without spending time synchronizing other galleries that are already up to date. However, up-to-date galleries do synchronize quickly especially on LTE or WIFI since only the date/time of the image is downloaded from the server to compare with the local copy.
Photos can be automatically rotated to match the screen aspect ratio ensuring that each photo fills the screen to the fullest extent. Additionally, photos can also be zoomed to fill the screen entirely so that there is no blank border area showing across the sides of a photo.(see Zoom To Fill and Rotate Disable below ). This can cut off quite a bit of the photo on the short dimension of the screen on the newer iphones where the aspect ratio of the screen is quite a bit taller and narrrower than most image aspect ratios.
Please report any issues or problems to info@riverrocklogic.com.
Sync Photo is not affiliated with or endorsed by Smug Mug, Inc.
Current Issues
None
Latest Release
The Latest released version is 4.3. This version changes the communication protocol with the SmugMug servers to their “V2” version. This change does not alter the way SyncPhoto appears to work to the user and only affects communications with the SmugMug servers. However some indexes and other value change behind the scenes and it is a good idea to re-synchronize with the SmugMug servers to prevent any problems.
Go to “Settings/Select Galleries” and click the circular arrow on the lower left of the page to synchronize the galleries available on your smugmug site. Then click on “sync” in the upper right or go to “Settings/Sync Galleries” and again click on the circular arrow in the lower left to synchronize all of the images. These two actions will ensure that SyncPhoto is properly up-to-date with the SmugMug servers.
Privacy Policy
The privacy policy can be found here.
Downloading Tips
The first time Sync Photo runs, you will need to log into SmugMug with your username and password. Tapping the “gear” icon on the right of the tool bar brings up the Settings view where ”Login Setup” should be tapped to log on to your SmugMug account. This logon is actually performed through SmugMug itself on their website. SyncPhoto hosts a web browser window on the Logon view and points that browser at SmugMug. After the logon completes a token is returned to SyncPhoto which it is used by SyncPhoto to access to your photos on Smugmug. Sometimes you may need to wait a few seconds(10-15) for the logon to complete and the token to be returned to SyncPhoto, so don’t return out of this view too quickly. Exiting the logon setup view too quickly might cause the process to fail resulting in no access to Smugmug. If this happens, repeat the log on process again, but wait longer before returning from that view.
Once the login information is set correctly tap on the “Select Galleries” item and then tap on the “circular arrow” on the tool bar( bottom left). This will load a complete list of all galleries from the Smug Mug server. Select any of those galleries for synchronization ( downloading ) to the device. This app was written before the hierarchy of folders was introduced at SmugMug so it shows all of the galleries in one flat list. The gallery list can be sorted by date (default), alphabetically by gallery name or category name, or by the “selected” check mark.
Tip: If downloading appears to fail for any reason, try selecting a smaller number of galleries to synchronize, or just synchronize one small gallery first, then synchronize additional galleries incrementally. It should be possible to work around download problems in this way.
There are two separate views associated with downloading galleries. The “Select” view is used to specify which galleries to download. The “Sync” view is used to actually download the galleries. This second view allows downloading a subset of all of the selected galleries without affecting which galleries are selected. In this way if only one gallery on the SmugMug account has changed, selecting just that gallery in the “Sync” view downloads only that gallery without affecting the selection of the other galleries and without downloading the other galleries. Note that galleries with no changes will synchronize quickly since SyncPhoto checks each image date and if none are more recent, nothing is downloaded (other than the date information). It is somewhat faster to limit syncing to only those galleries that have changed, especially over a cellular network. However will cellular data link speeds so high these days simply syncing everything is also very quick.
Of course synchronizing over a cellular network will use the data on your data plan. It is potentially faster and less costly to synchronize galleries when connected to a WIFI network.
Settings
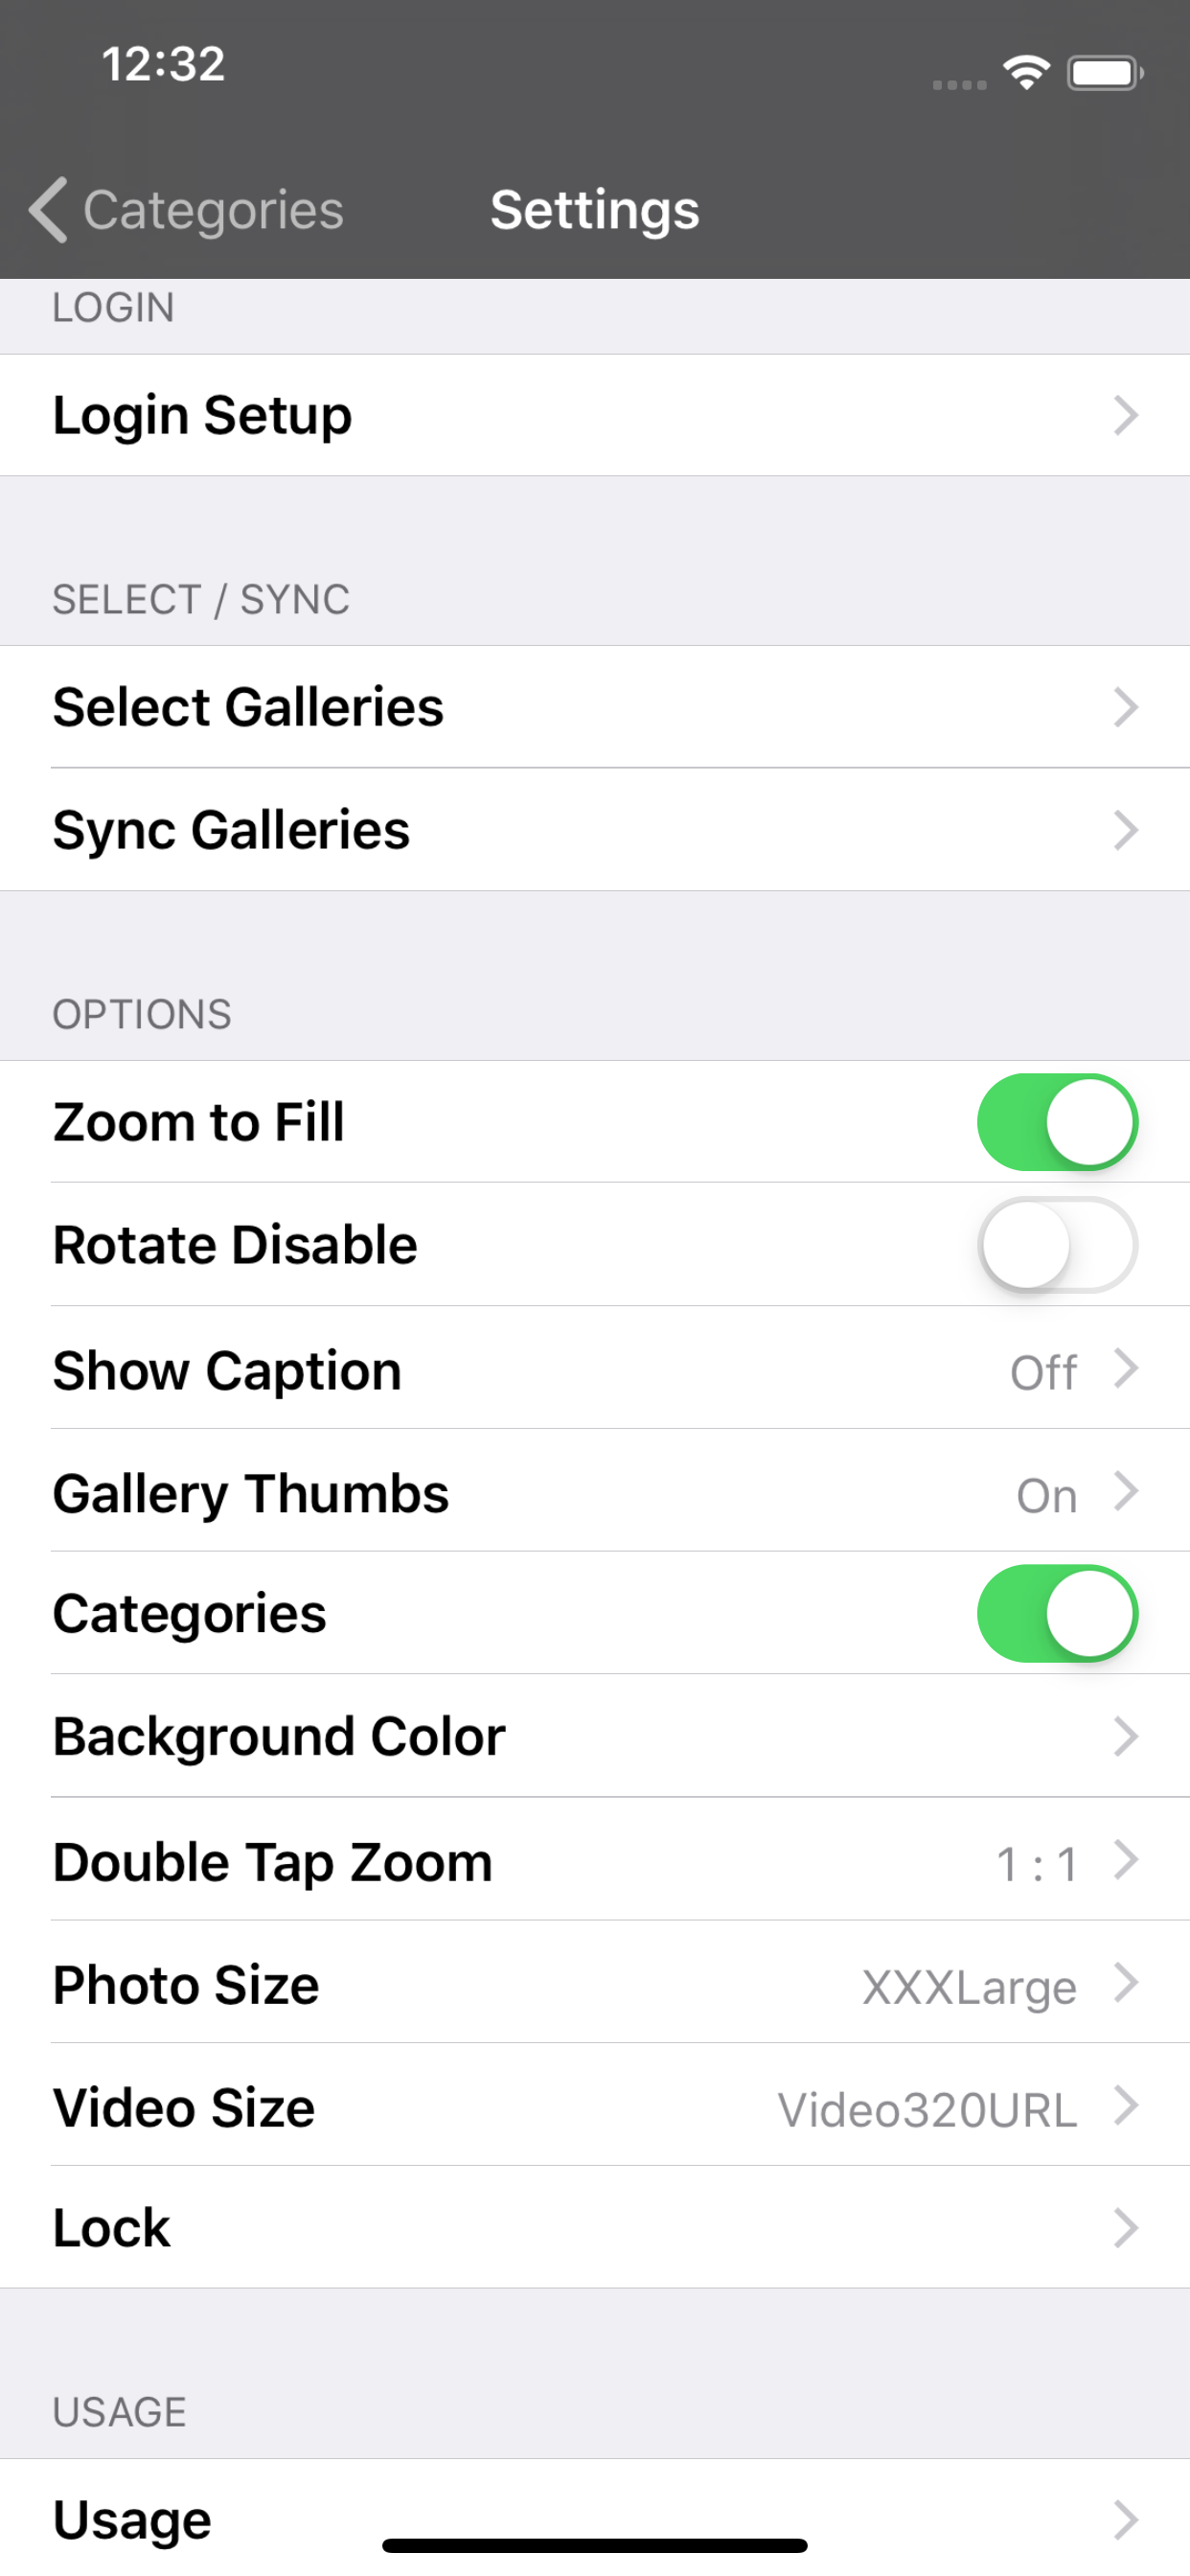
To access the “Setting” view tap on the two-gear icon on the bottom right of the main Galleries/Categories view. The Settings view contains a number of switches and links to subviews:
Login Setup
In order to access your galleries on SmugMug you must log into SmugMug. SyncPhoto presents the web login page from SmugMug itself where you can enter your username and password directly to SmugMug (SyncPhoto does not see these values). SmugMug returns an authorization token to SyncPhoto and that token is stored for future use. This token can be deleted anytime on the SmugMug website under your Account Settings to de-authorize SyncPhoto access to the site. Sometimes this login process can be slow and take some time to return the authorization token back to SyncPhoto after entering your logon credentials. Once the token is returned to SyncPhoto the web page will redirect to the SmugMug main page. At this point you can go back to settings and tap Select Galleries.
Select Galleries
This view lists all galleries visible on the SmugMug account configured in the “Login Setup” screen. The first time into this view, the list will be empty. Tapping on the tool bar button “circular arrow” contacts the server to get the current list of galleries from the server. Anytime new galleries are added to the server this tool bar button must be tapped to get the most up to date list of galleries from the server. Selection of the galleries to be downloaded to the device ( synchronized ) is made by simply tapping an entry. A check mark beside a gallery indicates it will be copied to the device during the sync step ( below). Galleries can be sorted by tapping the folder icon in the lower right. The “selected” option shows the currently selected galleries first, sorted alphabetically. There is a search bar at the top of the page that can be used to search for a particular gallery by name.
Sync Galleries
This view lists which galleries are selected for download to the device. All or any of the galleries can be downloaded simply by adding or removing the check marks. For example if only one gallery has changed on the server, simply tapping the ”checked box” in the navigation bar will remove all of the check marks, then tapping on the gallery to be synchronized will enable only that gallery to be synchronized. None of the other existing galleries will be affected by synchronizing just one gallery. Search is also available in this view.
Delete Galleries
To delete a gallery, tap on Select Galleries, unselect the gallery to be deleted and tap on the Sync button on the top right. In Sync view tap the “checked box” in the top right to unselect all galleries and then tap the circular arrow on the toolbar to download. Unselecting all galleries first is a faster way to delete a gallery because it removes the need to check the server for all selected galleries, but it will still delete the galleries that were unselected in the “Select Galleries” view.
Alternatively galleries can be deleted from the “Galleries” view outside of Settings by side swiping to the left on any gallery and tapping the delete button. Also in the Galleries view, the Edit button on the top right of the Navigation bar can be tapped and galleries deleted from that view.
Zoom To Fill
Photos with a different aspect ratio than the screen would normally appear with a blank border on the sides or bottom/top without enabling this feature. When this feature is on, photos will be zoomed in a just enough so that the entire device view is filled with the image. Some of the photo may not be visible along one dimension due to the zooming, however the image can be zoomed out by using inverse pinch gesture to see the entire image. This feature is best used with the following feature “Rotate Disable”. Without enabling Rotate Disable, photos of the opposite orientation as the device will be zoomed in and a lot of the image will not be visible without zooming out again. For example a portrait image viewed with the device in landscape mode will zoom in on the image enough so that the width of the image fills the long dimension of the device ( the width of the device in landscape mode). This amount of zooming will push the top and bottom of the image off the view.
On some newer iPhones quite a bit of the image can be pushed outside the view simply because the aspect ratio of the screen is so different than the image aspect ratio. Zoom out by pinching together on the screen to see the whole image. Then double tap to return to the original size, so that you can flip to the next image. If you zoom out far enough (pinch together) the image will go back to its default size and fill the screen again.
Rotate Disable
This setting disables the automatic rotation feature built into the device. Photos are then positioned on the view so that the long axis of the photo corresponds to the long axis of the view. Photos oriented in this manner appear as large as possible in the view. It may be more convenient to view photos with this switch on because the device itself can be quickly rotated to orient the photo right side up.
Show Caption
Show Caption displays caption information as an overlay on each image. Tapping this item opens another view where Caption, Date and Exposure information can be selected for display on each image. In that subview there is a switch titled “Show with Tap”. When this switch is on the caption will not show unless the user taps the view with two fingers. A single tap with two fingers on a view switches the caption on and off.
Gallery Thumbs
Tapping this setting shows a view where the Gallery list thumb image size can be changed. If this feature is enabled the first image in each gallery will be used as a thumb image beside the gallery name in the Gallery list view.
Categories
This organizes galleries according to the Category of the gallery on SmugMug and presents the Category view as the top view when viewing images.
When Gallery Categories are changed on the server there is a simple way to have those changes applied on your device without redownloading all of the Galleries. Simply go the the “Select Galleries” view and tap on the circular arrow on the bottom left of the tool bar. This will update the category names associated with each gallery. To save this change on your device tap on the down arrow icon and then on the Sync view, select any single gallery and tap the down arrow to sync that gallery. It isn’t necessary to sync the gallery with the changed category, just syncing any gallery will save the category changes for all galleries.
Background Color
The background shade of gray can be changed using this setting. There is a separate setting for the table background and the image background.
Double Tap Zoom
This option sets the magnification for a double tap on an image. Normally this value would be set to 1 : 1 so that double tapping an image would zoom in an image to show a pixel on the image as a point on the screen. Using this option allows setting the double tap zoom to any value between .1 and 5. The amount of zooming that occurs on a double tap depends on the pixel dimensions of the image downloaded. Double tapping on a higher pixel count image will result in a larger zoom effect.
Photo Size
Photo Size shows the currently selected download photo size. Tapping this item displays a view with the available download sizes supported by SmugMug - from Thumb size to the Full or Original size of the photo. A Custom size can also be specified. This can come in handy with newer hardware that has higher resolutions than the default SmugMug sizes. One drawback of the Custom size is that it takes longer to download possibly because the SmugMug server has to generate that custom size for each photo as the request appears at the server.
The Original size photo is the photo that was uploaded to Smugmug. As a result, this photo will contain all of the metadata (EXIF data) that was originally uploaded. If you want this metadata present when copying the photo to the camera roll then it is best to be sure the Original sized photo has been downloaded before copying to the camera roll. The Copyright is one of the EXIF items that is only present in the Original size file, for example.
Sync Photo tries to choose a sensible default size depending on the resolution of the device in landscape mode. If a different size is selected for download, then that size will be used on the next download ( Sync ) of a new gallery. Already downloaded galleries will not use the new size unless the gallery is deleted and re-downloaded. To delete a gallery tap on Select Galleries, unselect the gallery to be deleted and tap on the downward arrow icon to get to the Sync view. In that view tap the check box in the top right to unselect all galleries and then tap the circular arrow to sync with the server. Unselecting all galleries first is a faster way to delete a gallery because it removes the need to check the server for all selected galleries, but it will still delete the gallery unselected in the Select view. Galleries can also be deleted by left swiping the gallery name in the view showing the list of galleries, outside of the Settings views.
The Photo Size view has an additional slider control at the bottom of the page to control the resizing of Full or Original images. Since full sized images can be very large ( 40 MB or more ), sometimes they must be resized smaller to be viewable on the iPhone or iPad due to the limited memory in the device. Newer devices have more memory and can deal with these large 40MB plus image sizes. The slider allows some choice over the size of the image after is it resized. Sync Photo tries to choose a sensible default but it also allows the user to change the value. The downside of selecting too large of a size is that the image might not display on the device. If this happens Sync Photo will present a message indicating that a smaller size should be chosen. Another downside of choosing a large photo size is the time it takes to flip from one photo to the next gets longer as the size gets bigger, although this problem is mitigated by faster iPhone hardware with the latest releases by Apple. The benefit of a larger photo size is that more detail is revealed when zooming in before the image pixelates and becomes blurry.
It is also possible to change the size of an individual photo when viewing the photo. Tap on the photo and choose the “Down Arrow” icon on the toolbar. Select a different download size and tap the down arrow or circular arrow on the toolbar. If that file size is already downloaded then tapping the circular arrow will simply use that file without downloading it again. If for some reason that file is corrupted or the Full/Original resize value has been changed then tap the down arrow in the toolbar to force a fresh download from the server. Tapping the downward arrow always contacts the server and re-downloads the image. It can be handy to be able to resize photos in order to zoom in and see more detail. Larger photos take up more resources and don’t “flip” as smoothly, so there can be a trade off here.
Sometimes Full/Original images that used to be viewable are no longer viewable - a message pops up indicating that memory is running low on the device. Sometimes this message simply goes away by flipping to another image. If that does not work, try downloading a smaller image. Rebooting the device can often correct the problem. If that does not work, go into the Settings view ( tap on the two gears ) and tap on Photo Size, scroll to the bottom and change the Full/Original resize slider to a smaller value. Then go back and view the photo that is too large to view - tap on the “black” image background and select the “Down Arrow” icon in the tool bar, then tap the Down arrow on the tool bar of the “Image Size” view. This action will download the image from the server again, and resize it according to the new resizing value for Full/Original images. Repeat this sequence until the resized image is small enough to be viewable within the memory constraints of the device.
Video Size
The downloaded video size is set on this view. The number in the name refers to the width resolution of the video in pixels. Downloading a larger resolution will take considerably longer. The default value is the lowest value. There is no automatic logic to try and select the best size for a particular device. When viewing a video it is possible to tap on the video and download a different size in a similar manner to still images.
Usage
The Usage view shows the amount of the local device hard drive that is currently being used by photos downloaded from SmugMug. This view can take quite a while to pop up since it enumerates each image in all the galleries.
Image Detail
The amount of detail visible in an image is determined in part by the size of the image downloaded. When zooming in on an image if there isn’t sufficient detail, zoom the image back out to the normal size, by double tapping on the image. Then tap the image once to bring up the tool bar at the bottom of the screen.
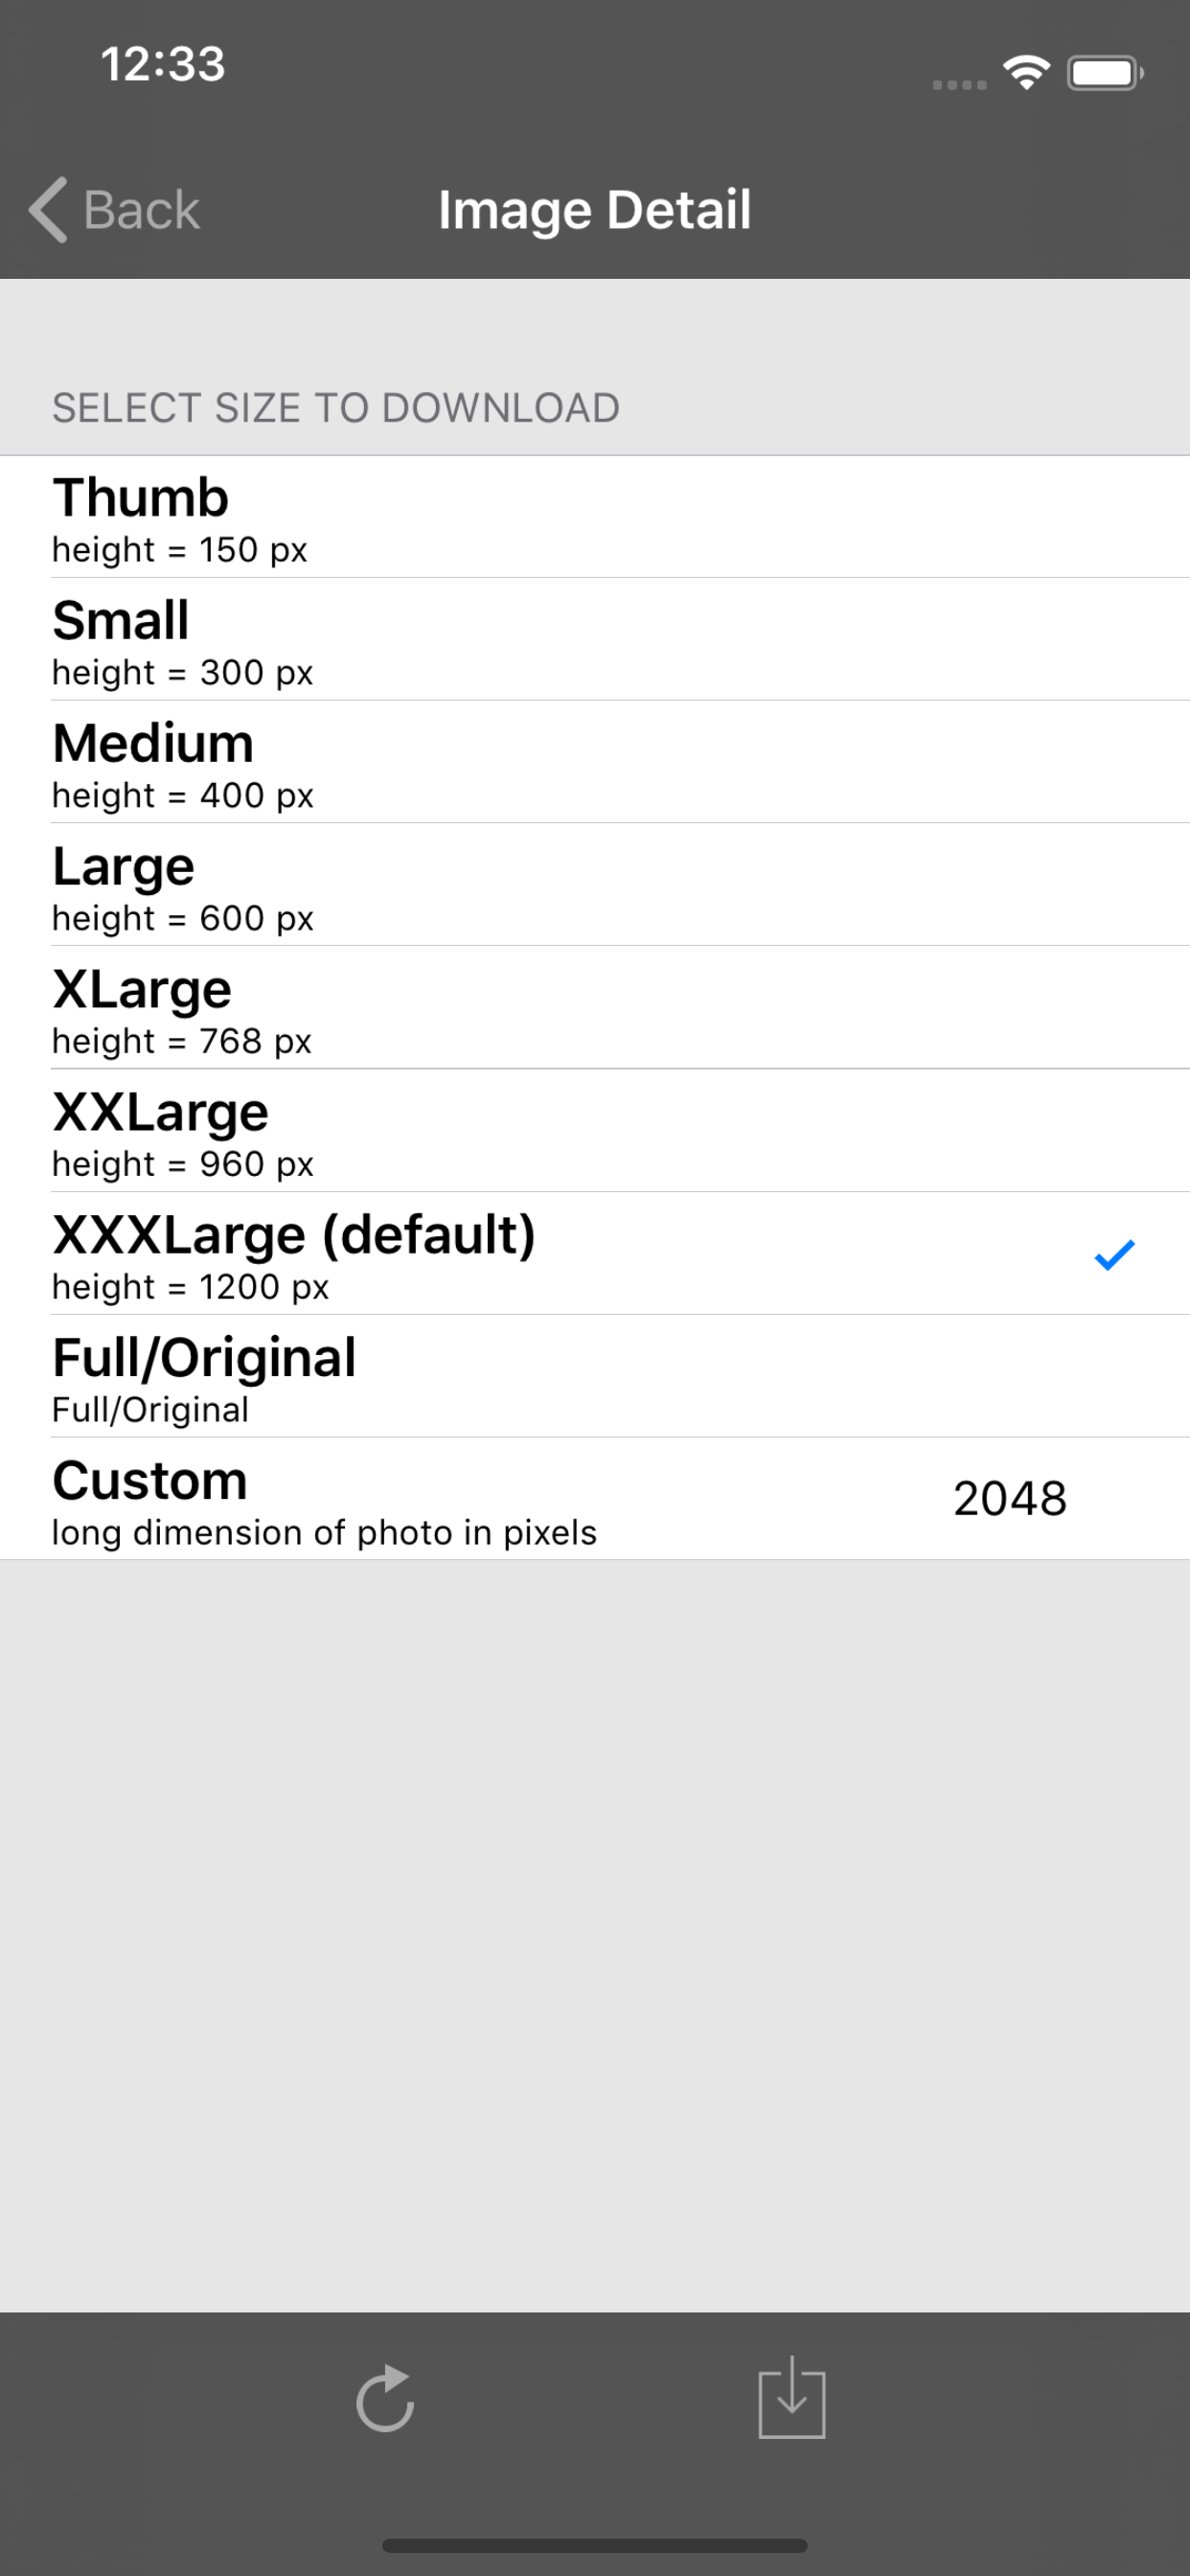
Tap on the “download icon” (vertical down arrow ). A new view will pop up titled “Image Detail” as shown on the right.
In this view the currently downloaded image size is shown with a check mark. Select a larger image size ( going down the list ) and tap the “circular arrow” on the toolbar to download the larger image from the smugmug server.
The other icon on the toolbar, the straight down arrow also downloads from the server. The difference between the two is that the circular arrow will check if the larger image is already downloaded and not download it again if present, whereas the straight down arrow will always download a new copy from the server. The circular arrow is more efficient if you already have the image downloaded. Using the straight arrow forces a new download which can be useful if somehow the image has become corrupted on the local device and does not display correctly.
IPad Specific
The iPad displays photos in a split view controller allowing two columns to be shown side by side in landscape mode. There are a couple of options on the Settings view to control how the split view controller works. The first setting is the Categories setting( see the Categories section above). With this setting turned on the split view will show categories in the left pane and show galleries per category in the right pane. When this is off then the categories are not shown and the left pane simply shows a list of all galleries downloaded.
The second option for controlling split screen layout is a setting called Full Screen From Thumb. When this setting is on, tapping on a thumbnail in the right pane (see image below), will pop open that image full screen. When this setting is off, tapping on an thumbnail will show the image in the right side of the split view ( see the second image below). The “Full Screen From Thumb” setting is a shortcut to get to full screen image. It is still possible to get a full screen image from the split view screen below by tapping the right screen image and then tapping on the two arrow icon in the lower left of the toolbar.
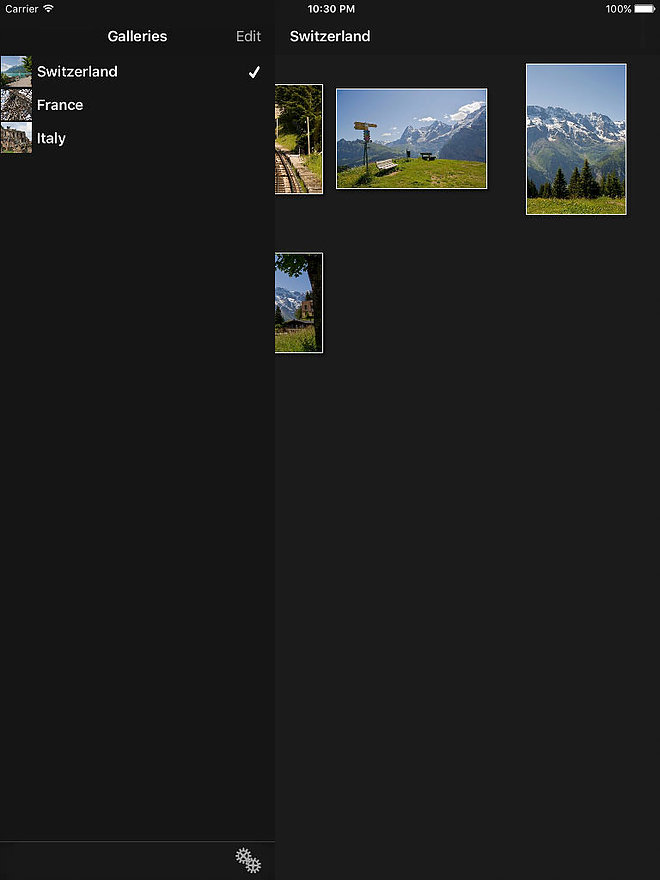
The image below shows the galleries in a particular Category (in this case the “Other” category) in the left pane and the thumbnails of the selected gallery in the right pane.
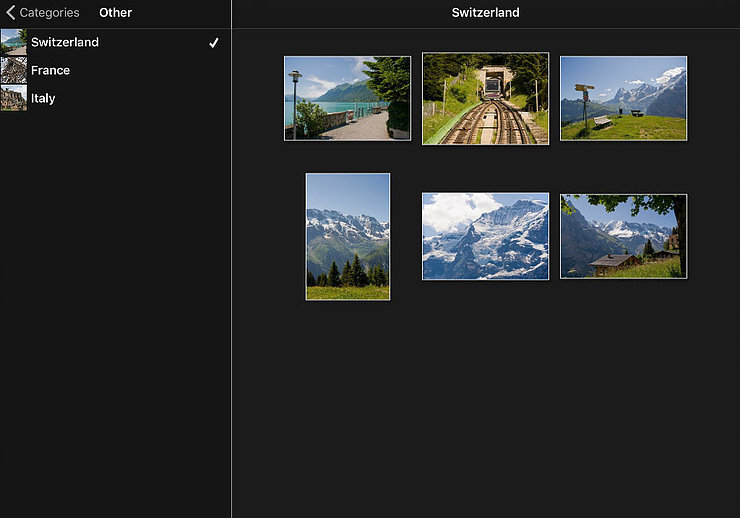
Tapping on one of the images in the right pane shows the thumbnails in the left pane and the selected image in the right pane. Images can be scrolled one a time in the right pane, or the left pane can be scrolled up and down and an image selected from that pane.
It is also possible to show the image full screen by tapping on the image and then tapping left tool bar item ( two outward pointing arrows).

In portrait orientation, the iPad shows the left pane as a panel that slides in from the left when the “two pane” icon on the top navigation bar is tapped.